
More on the Auto-Magic filter
The Auto-Magic filter is available as either a 50x50mm sheet of internal mounting gel filter (AM) or an external mounting solid filter (AMS) available in a variety of sizes and mount types - see the buy page.
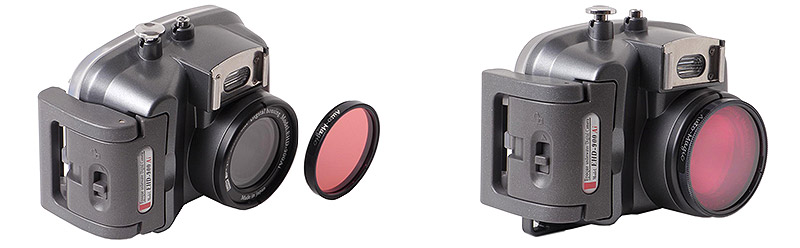
Fitting external mounting filters
The external mouting filter is straight forward to mount and just needs to be screwed or pushed onto the front of you compact camera housing. It can be easily added or removed underwater.
Fitting internal mounting filters
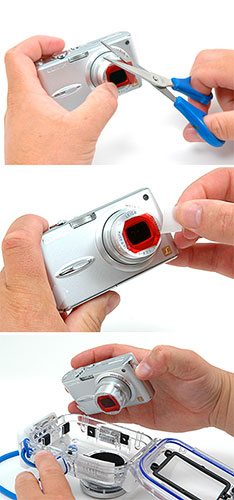
The paper-thin polyester gel version of the Auto-Magic filters is waterproof, but we do NOT recommend mounting them on the outside of the housing as they can be easily scratched or lost. Instead we recommend that you cut them to size and either stick them with tape onto the lens of your camera or fit them to the inside of the port of your housing. This short video shows you how to do it, or see the images and instructions below:
The easiest cameras are those with
internal lenses (which do not
protrude) because you can just cut a small square from the filter,
slightly larger than the lens on your camera and stick it in place with
a piece of sticky tape (below, left). For most other cameras the
easiest way to
attach a filter is to stick
it onto the front of the lens surround. Cut a piece of filter that is
slightly larger than the lens and then while holding it in place, trim
the corners with a pair of scissors. Then simply secure it in place
with some strips of tape (below, right).

The alternative way to mount the filter is to cut it so it is slightly smaller than the internal diameter of the port of the housing. Then just drop the filter into the housing. As it is slightly smaller than the internal diameter of the port is should be easy to add and remove (below, left). The lens should hold it in place, but if you want to secure it more firmly it can be held in place with a small piece of sticky-tack.
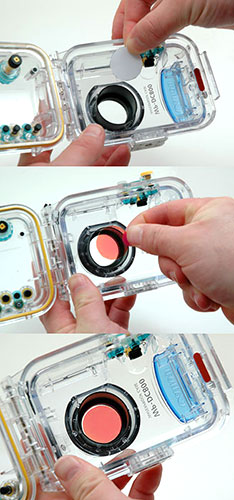

We supply a stencil with the filter, which makes it very easy to cut them to size. Simply fold the stencil over the filter and while holding securely, cut round the correct size for your housing (above, right). You may want to practice with just cutting one of the stencils provided without the filter first, to make sure you have the correct size. Curved nail scissors are useful for cutting circular filters.
There is more information on fitting filters in the tips section of this website. The Tips & Techniques section also contains detailed information on how to shoot with the Magic Filter.
The Auto-Magic filter is available as either a 50x50mm sheet of internal mounting gel filter (AM) or an external mounting solid filter (AMS) available in a variety of sizes and mount types - see the buy page.
Fitting external mounting filters
The external mouting filter is straight forward to mount and just needs to be screwed or pushed onto the front of you compact camera housing. It can be easily added or removed underwater.
Fitting internal mounting filters
The paper-thin polyester gel version of the Auto-Magic filters is waterproof, but we do NOT recommend mounting them on the outside of the housing as they can be easily scratched or lost. Instead we recommend that you cut them to size and either stick them with tape onto the lens of your camera or fit them to the inside of the port of your housing. This short video shows you how to do it, or see the images and instructions below:
The alternative way to mount the filter is to cut it so it is slightly smaller than the internal diameter of the port of the housing. Then just drop the filter into the housing. As it is slightly smaller than the internal diameter of the port is should be easy to add and remove (below, left). The lens should hold it in place, but if you want to secure it more firmly it can be held in place with a small piece of sticky-tack.
We supply a stencil with the filter, which makes it very easy to cut them to size. Simply fold the stencil over the filter and while holding securely, cut round the correct size for your housing (above, right). You may want to practice with just cutting one of the stencils provided without the filter first, to make sure you have the correct size. Curved nail scissors are useful for cutting circular filters.
There is more information on fitting filters in the tips section of this website. The Tips & Techniques section also contains detailed information on how to shoot with the Magic Filter.
[Auto-Magic filters] [Buy Auto-Magic filters]
[About Magic] [Magic Galleries] [FAQ] [Tips & Techniques] [Contact/Dealers]
[Auto-Magic filter] [original Magic filter] [Greenwater Magic filter] [Instructional DVD] [Online Store]