
Do I Really Need A Filter?
One question we get asked a lot is what is the advantage of using a filter, compared with just using the camera's manual white balance alone. When you are very shallow, just below the surface, in the top 3m (9ft) then white balance alone is absolutely fine. However, once you are deeper than 3m (9ft) the advantages of a filter become more and more apparent.
The main advatanges of using a filter, as opposed to white balance alone, are more subtle variations of foreground colour, and probably most noticeable, you get these colours with a richer blue background. Many photos taken with manual white balance are characterised with a completely washed out background water colour. Filters produce a much richer blue. A strong blue background is an important asthetic element in an underwater photograph. Last time I checked, the sea was blue!
I took the two lemon shark photos, below, on the same dive site in shallow water 3-4m (9-12ft), both these images are shown exactly as taken on an old Fuji F50 compact camera:
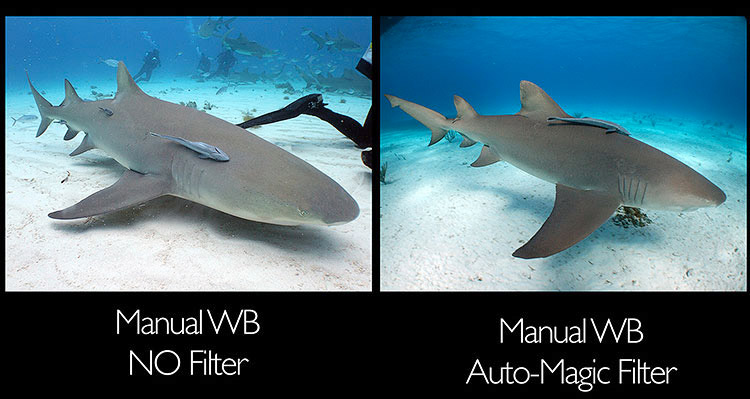
To some extent both images are acceptable. If you put you hand up to the screen and cover the image on the right and look at the no-filter, manual white balance photo (left) in isolation - it is fine. It is only when you see what a filter adds that you realise the benefits. Filters do much of the work of correcting the colour balance, so the camera's electronics don't have to push and pull the colours so much. This means that small differences in colours are recorded in the foreground. Look at the much more subtle variation of colours on the sand, for example. Also filters attenuate (block) blue light. This makes the background water appear much a darker and richer blue than in non-filtered shots. A deeper depths than this, a photo taken with manual white balance and no-filter will often have grey water.
Filters are also a benefit if you do not want the hassle of using manual white balance at all. The Auto Magic filter has been designed to be point and shoot simple. In shallow water there is no need to use maual white balance at all. Just fit the filter and take colourful shots with full automation. I took the two images below on the same dive with a Canon S90 compact camera with AUTO white balance. The image on the left is taken without a filter, the image on the right was taken with the addition of an external mounting Auto Magic filter. There were no other changes:
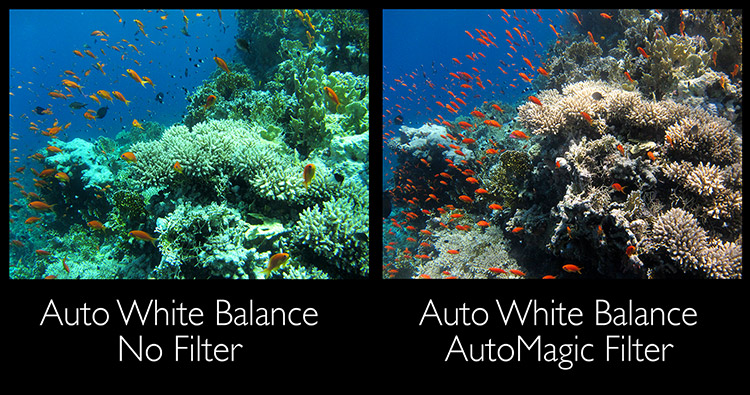
The photo with the filter has much more neutral and correct colours on the reef. The blue water is also slightly richer.
The highly popular GoPro camera is another good example. The GoPro only has auto white balance and underwater tends to therefore produce very blue footage. The AutoMagic filter transforms its capabilities as this RAW footage I shot on the Giannis D wreck in the Red Sea shows.
The AutoMagic filter can also be used with manual white balance. If we had used manual white balance instead of auto white balance for the two reef shots above, then the no filter image would show more correct colours on the coral and richer reds on the fish. The manual white balance would suck the greeny-blue colour cast out of the picture. However, this process effects the whole image and it would also suck the blue out of the water. So you would get the colours of the reef, but a washed out blue water colour. If you already use manual white balance without a filter, have a look at your pictures and see if they show this. If we had used manual white balance with the photo of the right, the colours of the reef might be slightly improved (they are already pretty close) and because less blue has to be sucked out of the image, the water would still be a rich blue colour.
This example, of three SLR photos from the Red Sea are all taken on the same wreck. The left hand image was taken on slide film, which rendered the scene completely blue. The middle image is taken with a digital SLR without a filter, but using manual white balance. The white balance has brought out some of the colour of the wreck, but it has also taken all the blue out of the water behind the wreck, making it almost grey. Because this is deeper than the examples above, you can see the effect more clearly. The right hand image is taken with the same digital camera and lens, but this time using a original Magic Filter. Here the colours of the wreck are brought out and it stands out from the background water, which is also recorded as an accurate blue.
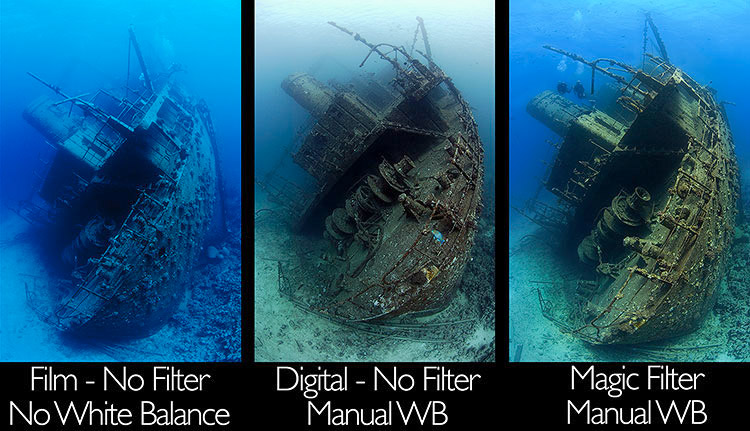
As an aside, these three photos are actually very autobiographical on the genesis on Magic filters. I (Alex) took the photo on the right in about 2000 on film. It is a classic composition and the Giannis D wreck is ideal for a fisheye shot. The middle image was taken in March 2005, which was the first time I photographed the Giannis with a digital camera and 180 degree fisheye lens (the Nikon 10.5mm was only out in 2004). I used manual white balance for this shot, but was disappointed with the washed out look of the water, so set about designing a filter, that would fit on my fisheye lens. So that by June 2005 I was able to take the shot on the right, getting good colour on the wreck and holding the blue water behind. The Magic Filter was actually created to take this photo (which has been published in several books and many, many magazines around the world. And we also found it was rather good for other subjects too. We began selling the filter in August 2005.
The final problem with making large manual white balance adjustments is that they introduce electronic noise and reduce the dynamic range shown in the shot (with highlights more liable to blow out). Using a filter is better because it does most of the work and the electronic processing in the camera does less, so you get less noise. The amount of noise you will get when using manual white balance without a filter will depend on your camera and also your depth. At shallow depths, less than 3m (9ft) the noise will be negliable. Deeper it will increase. DSLR cameras control noise much more than digital compacts. The example below is from a DSLR, if you shoot a compact you can expect the noise to be much worse.
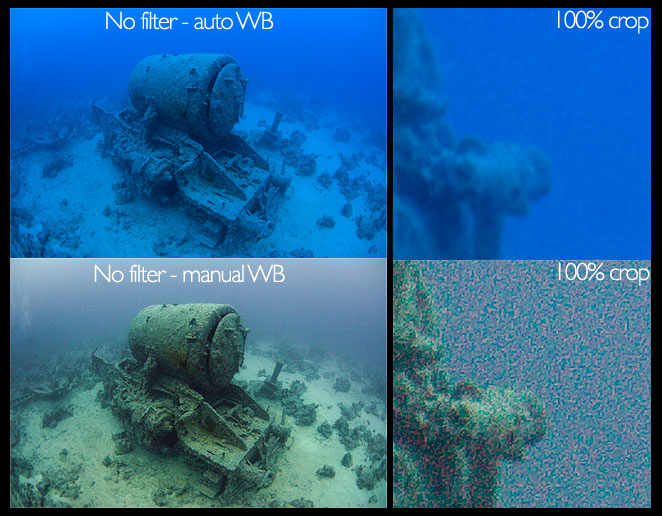
These two photos below show the same subject processed from a RAW file at 16-bit with a standard "blue-look" auto white balance (top) and a manual white balance (below). No filter was used. Viewing them small on the screen the manual white balance clearly reveals come of the colours of the train, although it also sucks the blue out of the water in the background (as we have seen above). However, here I want to focus on when we look at the image in detail. 100% pixel crops are shown on the right of each image. We can see that the strong white balance correction required to correct colours without a filter has introduced lots of noise - seen as a speckled texture. For on screen viewing this noise is not that important as you won't show an image at 100%. But if you want to print your photos, this degradation in image quality obscures the details of the subject and will restrict the size to which you can print.
Strobe Or Filter?
Finally, I am also regularly asked the question strobe or filter? I shoot at least 80% of my underwater images with strobes. And the choice between strobe or filter depends on the subject matter, the type of shot I am after and the conditions. Filters excel at shooting large scenes, that are too big to light with strobe. Reef scapes, schools of fish, large pelagics and wrecks are classic filters subjects.
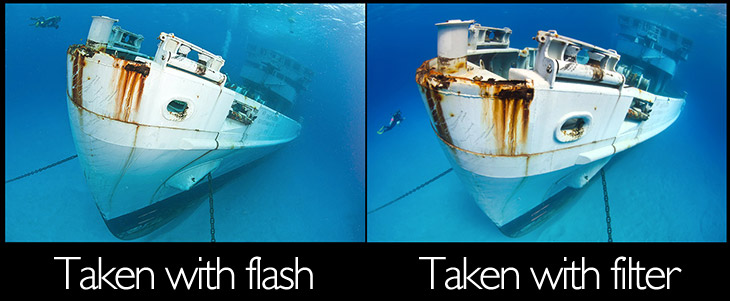
The example images below were both taken in January 2011 shortly after the USS Kittiwake was sank, while her white paint was still visible. I took both images with fisheye lenses and I believe that these clearly show a situation where a filter produces a much more pleasing image than flash. First both images come out, the differences are more subtle, but they are the sorts of differences that really make an image stand out. The image on the left was taken with flash and while the flash lights the tip of the bow, it quickly falls off with distance. The image on the right was taken with filter and as a result colour penetrates more deeply into the image. The flash also flattens the texture of the wreck, which appears much more three dimensional in the filter shot. And finally the filter has produced a strong, rich blue water colour, which really makes the white wreck pop out. The picture on the right has been published in a number of newspapers around the world, including the Daily Mail and Daily Telegraph in the UK. The image on the left has not been published.
[About Magic]
[Magic Galleries]
[FAQ] [Tips
& Techniques] [Contact/Dealers]
[Auto-Magic filter] [original Magic filter] [Greenwater Magic filter] [Instructional DVD] [Online Store]
One question we get asked a lot is what is the advantage of using a filter, compared with just using the camera's manual white balance alone. When you are very shallow, just below the surface, in the top 3m (9ft) then white balance alone is absolutely fine. However, once you are deeper than 3m (9ft) the advantages of a filter become more and more apparent.
The main advatanges of using a filter, as opposed to white balance alone, are more subtle variations of foreground colour, and probably most noticeable, you get these colours with a richer blue background. Many photos taken with manual white balance are characterised with a completely washed out background water colour. Filters produce a much richer blue. A strong blue background is an important asthetic element in an underwater photograph. Last time I checked, the sea was blue!
I took the two lemon shark photos, below, on the same dive site in shallow water 3-4m (9-12ft), both these images are shown exactly as taken on an old Fuji F50 compact camera:
To some extent both images are acceptable. If you put you hand up to the screen and cover the image on the right and look at the no-filter, manual white balance photo (left) in isolation - it is fine. It is only when you see what a filter adds that you realise the benefits. Filters do much of the work of correcting the colour balance, so the camera's electronics don't have to push and pull the colours so much. This means that small differences in colours are recorded in the foreground. Look at the much more subtle variation of colours on the sand, for example. Also filters attenuate (block) blue light. This makes the background water appear much a darker and richer blue than in non-filtered shots. A deeper depths than this, a photo taken with manual white balance and no-filter will often have grey water.
Filters are also a benefit if you do not want the hassle of using manual white balance at all. The Auto Magic filter has been designed to be point and shoot simple. In shallow water there is no need to use maual white balance at all. Just fit the filter and take colourful shots with full automation. I took the two images below on the same dive with a Canon S90 compact camera with AUTO white balance. The image on the left is taken without a filter, the image on the right was taken with the addition of an external mounting Auto Magic filter. There were no other changes:
The photo with the filter has much more neutral and correct colours on the reef. The blue water is also slightly richer.
The highly popular GoPro camera is another good example. The GoPro only has auto white balance and underwater tends to therefore produce very blue footage. The AutoMagic filter transforms its capabilities as this RAW footage I shot on the Giannis D wreck in the Red Sea shows.
The AutoMagic filter can also be used with manual white balance. If we had used manual white balance instead of auto white balance for the two reef shots above, then the no filter image would show more correct colours on the coral and richer reds on the fish. The manual white balance would suck the greeny-blue colour cast out of the picture. However, this process effects the whole image and it would also suck the blue out of the water. So you would get the colours of the reef, but a washed out blue water colour. If you already use manual white balance without a filter, have a look at your pictures and see if they show this. If we had used manual white balance with the photo of the right, the colours of the reef might be slightly improved (they are already pretty close) and because less blue has to be sucked out of the image, the water would still be a rich blue colour.
This example, of three SLR photos from the Red Sea are all taken on the same wreck. The left hand image was taken on slide film, which rendered the scene completely blue. The middle image is taken with a digital SLR without a filter, but using manual white balance. The white balance has brought out some of the colour of the wreck, but it has also taken all the blue out of the water behind the wreck, making it almost grey. Because this is deeper than the examples above, you can see the effect more clearly. The right hand image is taken with the same digital camera and lens, but this time using a original Magic Filter. Here the colours of the wreck are brought out and it stands out from the background water, which is also recorded as an accurate blue.
As an aside, these three photos are actually very autobiographical on the genesis on Magic filters. I (Alex) took the photo on the right in about 2000 on film. It is a classic composition and the Giannis D wreck is ideal for a fisheye shot. The middle image was taken in March 2005, which was the first time I photographed the Giannis with a digital camera and 180 degree fisheye lens (the Nikon 10.5mm was only out in 2004). I used manual white balance for this shot, but was disappointed with the washed out look of the water, so set about designing a filter, that would fit on my fisheye lens. So that by June 2005 I was able to take the shot on the right, getting good colour on the wreck and holding the blue water behind. The Magic Filter was actually created to take this photo (which has been published in several books and many, many magazines around the world. And we also found it was rather good for other subjects too. We began selling the filter in August 2005.
The final problem with making large manual white balance adjustments is that they introduce electronic noise and reduce the dynamic range shown in the shot (with highlights more liable to blow out). Using a filter is better because it does most of the work and the electronic processing in the camera does less, so you get less noise. The amount of noise you will get when using manual white balance without a filter will depend on your camera and also your depth. At shallow depths, less than 3m (9ft) the noise will be negliable. Deeper it will increase. DSLR cameras control noise much more than digital compacts. The example below is from a DSLR, if you shoot a compact you can expect the noise to be much worse.
These two photos below show the same subject processed from a RAW file at 16-bit with a standard "blue-look" auto white balance (top) and a manual white balance (below). No filter was used. Viewing them small on the screen the manual white balance clearly reveals come of the colours of the train, although it also sucks the blue out of the water in the background (as we have seen above). However, here I want to focus on when we look at the image in detail. 100% pixel crops are shown on the right of each image. We can see that the strong white balance correction required to correct colours without a filter has introduced lots of noise - seen as a speckled texture. For on screen viewing this noise is not that important as you won't show an image at 100%. But if you want to print your photos, this degradation in image quality obscures the details of the subject and will restrict the size to which you can print.
Strobe Or Filter?
Finally, I am also regularly asked the question strobe or filter? I shoot at least 80% of my underwater images with strobes. And the choice between strobe or filter depends on the subject matter, the type of shot I am after and the conditions. Filters excel at shooting large scenes, that are too big to light with strobe. Reef scapes, schools of fish, large pelagics and wrecks are classic filters subjects.
The example images below were both taken in January 2011 shortly after the USS Kittiwake was sank, while her white paint was still visible. I took both images with fisheye lenses and I believe that these clearly show a situation where a filter produces a much more pleasing image than flash. First both images come out, the differences are more subtle, but they are the sorts of differences that really make an image stand out. The image on the left was taken with flash and while the flash lights the tip of the bow, it quickly falls off with distance. The image on the right was taken with filter and as a result colour penetrates more deeply into the image. The flash also flattens the texture of the wreck, which appears much more three dimensional in the filter shot. And finally the filter has produced a strong, rich blue water colour, which really makes the white wreck pop out. The picture on the right has been published in a number of newspapers around the world, including the Daily Mail and Daily Telegraph in the UK. The image on the left has not been published.
Finally, please feel free to
"hot-link" any of Alex's or Peter's images from the Magic Filters
website on your blog, Facebook or in forum discussions when debating
the merits of filter photography underwater.
[Auto-Magic filter] [original Magic filter] [Greenwater Magic filter] [Instructional DVD] [Online Store]